Automating the backup process with Py.
Ok, so this is one of my first automation projects in a while and also the first of hopefully many that I’ll publish here. What this script does is move media from my Android phone to my computer so that I don’t end up with years worth of data that needs backing up. That’s the simplified version. The more detailed functioning includes:
- Navigating specific folders and searching for media.
- Categorizing and organizing data properly.
- Automatically check if a monthly backup already exists and append data to it instead of overwriting or creating a new dir.
IMPORTANT NOTE: The source directories might be different depending on the OS. I use a really old device and the new stuff probably works differently, but, just changing the source directories in the constants.py should work.
I’m approaching this in 3 main steps:
- Establishing Adb connection with the phone.
- Accessing the phone directories using adb shell via WSL.
- Backing up data from the phone to local storage.
In terms of directory structure will be something like this:
User > Device Name > Year > Month > File Type > Data Source
For example:
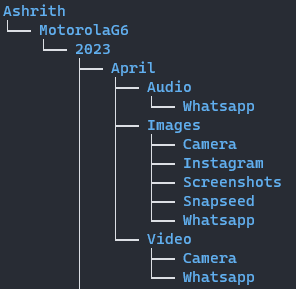
I’ll be adding documents and other file types at a later stage.
Here’s the system I’m running:
- Python 3.8.10
- WSL2
- Windows 10
- x64 processor
- Ubuntu 20.04 on Windows
- Linux Kernel version: 5.15.90.1
- USBIPD-WIN
- Android Debug Bridge (adb)
- USB debugging is enabled on the Android device.
Eventually, I’d want to modify this script to something that doesn’t need WSL and can detect the OS and work accordingly so that it becomes more of a plug-and-play thing with minimal customization.
The detailed process is below:
Accessing phone via WSL
Assuming that you have connected your device, we need to check if it is attached to the WSL environment and if we can access the Adb Shell. To do that, we do the following:
Command prompt
$ usbipd list
This will give you the list of USB devices connected to your machine and if it is attached to your WSL environment or not. The output will look similar to this:

Notice the “Shared” status, that means the device is not attached to the WSL env. We achieve that by running the next command.
$ usbipd wsl attach --busid <busid>
This command doesn’t return an output, so to check if the device is attached, we run the first command again and get the following output:

we can also check this by running the lsusb command in the WSL shell, which gives the output:

If you don’t see your device here, redo the above steps and see if you have written the correct bus id.
Now that the device is attached to the WSL environment, we can move on to gaining access to the adb shell. What I’ve noticed is that in case we have previously started the adb server, we still sometimes have access to the adb shell. This only happens sometimes and is unpredictable. So, I manually kill and restart the server.
WSL
$ sudo adb kill-server
$ sudo adb start-server
$ adb devices
$ adb shell
Executing adb devices on WSL should give you an outcome similar to the one below:
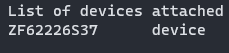
The “ZF62226S37” you see is the model number of the Android device I’m using. You’ll find the same model number in “device info” of your Android smartphone.
With this, we have everything we need to start moving files from the phone to our local machine. The command we’ll be using to move files across is the adb pull command that has the following format:
$ adb pull /path/to/phone/file /path/to/wsl/destination
Code
The codebase is divided into 3 main sections:
- connection.py : handles everything I’ve mentioned above.
- backup.py : takes care of moving the data across and organizing it.
- utils : Classes that help with running shell commands and creating directories.
backup.py
This performs two functions:
- Creates the folders on the local system into which the data will be backed up.
- Back up the data.
Preparing backup folders
Initially, I would check if the correct folder existed, and if it didn’t, I would create it, but this meant running a lot of find and mkdir commands. This was how I used to do it:
current_year = dt.now().year

command = f"find {parent_dir_path} -type d -path '{dirname}'"
command_execute, command_return_code = Utils.run_command(command)

if bool(command_execute) is False:
    mkdir_command = f"mkdir -p {parent_dir_path}{dirname}"
    execute_mkdir_command, mkdir_command_return_code = Utils.run_command(mkdir_command)
The above method could only find one directory at a time and could only make one directory at a time as well. This worked all right, as long as all the directories we created once, but it still doesn’t make much sense to check them one by one.
Now, I use the following to create all the required directories:
"bash -c 'mkdir -p ~/AutoMoverBackup/2025/June/Images/{Whatsapp,Instagram,Snapseed}'"
The number of commands I need to execute to create all required directories is equal to the number of file types I want to back up. The mkdir -p command makes parent directories as needed, and it does not throw an error if a directory already exists, which means I could create multiple directories at once.
The {Whatsapp,Instagram,Snapseed} part of the command is called brace expansion. With this, I can create multiple subdirectories inside the /Images (or any other file type) directory.
There was one problem, though. You see, I was using Python’s subprocess module to execute these commands, and it seems like it doesn’t support brace expansions. Brace expansion is a feature provided by the shell, and it is not directly supported by the subprocess.run function in Python. The solution was to run the command via the shell using bash -c, allowing you to leverage shell features, such as brace expansion, before executing the command.
Once this was figured out, all the required directories were ready, and we could start the backup process.
Create backup
We needed to back up only those files that were created this month and leave everything else untouched. This meant matching the file names with the current year and month. Most files had a common prefix and a common format, something like IMG-YYYYMM or VID_YYYYMM. I needed to use the find command to locate only files and pull only those files that matched this pattern. Here’s the command that I used; it looks a bit messy, but, it makes sense:
adb shell find SOURCE -type f | grep PATTERN | xargs -I {} adb pull {} DESTINATION
The breakdown of this is as follows:
- We start the interactive shell on Android devices using ```adb shell``
- Then, using
find, we search for files inside the SOURCE directory while restricting the search to only files using-type f. - The output of the find command is redirected to the
grepcommand, which filters out the files that don’t match the predefined pattern. - The output of the grep command, which is a list of file names, is then redirected to
xargs -I {}, which replace the{}in theadb pull {} DESTINATIONcommand with individual file names, which are then copied from the phone to the local machine, thus creating a backup.
Currently, I’m backing up images, audio and video from internal storage only. In future updates, I’ll backup data from the external storage as well and add support for other file types as well. I also want to add a progress bar. That would look cool.
NOTES:
- In the adb shell, the sd card is referred to as internal storage, and the external storage can be found at storage > 211D-190C. The “211D-190C” will probably be something else for you, but should be something similar.